What is a Packaging Dieline?
A dieline is the flat, unfolded engineering drawing of a piece of packaging. Every cut, fold, glue tab, tuck point, and bleed margin lives in a single 2D file. It's the blueprint your printer cuts and creases from — the instructions a sheet of paperboard follows to become a box.
The word "dieline" comes from the literal die — the cutting tool that stamps the shape of your box out of the paperboard. Same idea, many names: die line, die-cutting template, keyline, cutter guide, box net, structural design, or packaging blueprint. If a supplier emails you any of those words, they're talking about the same drawing.
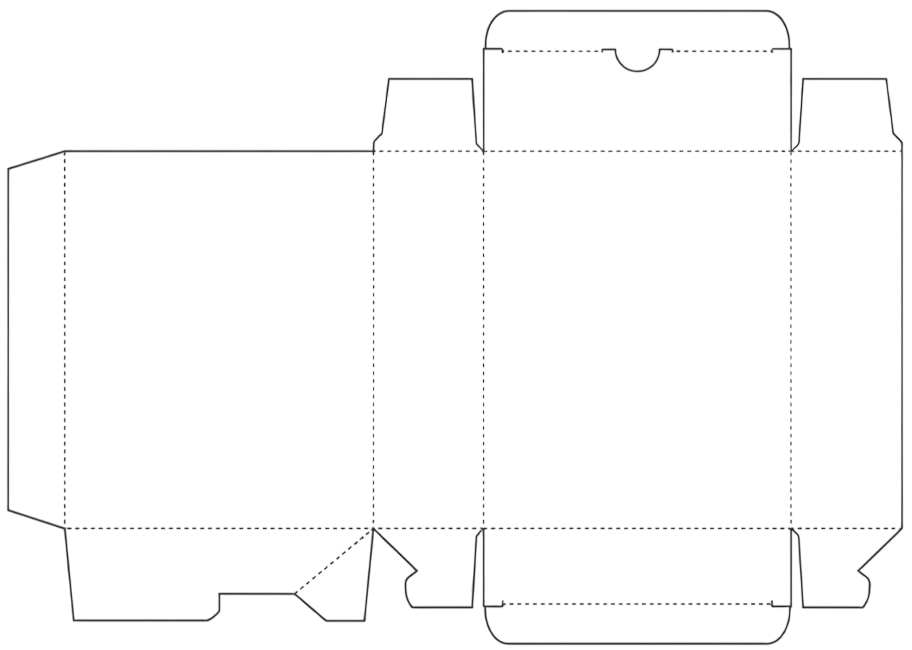
A typical folding-carton dieline: every panel, fold, and glue tab visible on one plane.
Why a Good Dieline Makes or Breaks Your Packaging
Packaging that looks beautiful in a render fails on the production line if the dieline isn't right. Bleed runs short and a white edge shows where the trim drifted. A misplaced glue tab tears the box open the wrong way. A logo too close to a fold cracks when the cardboard creases. These are the stories printers tell.
Precision saves money
The print shop charges you for setup once, plus material per run. A dieline that's off by half a millimeter forces a second proof, sometimes a new cutting die — both of which cost real money. Getting it right the first time means one round, one invoice.
Brand consistency across SKUs
If you have a product line — a serum, a moisturizer, a cleanser — a shared dieline framework makes the boxes feel like a family even when the artwork on each face is different. Customers notice consistency before they consciously register it.
Regulatory peace of mind
Ingredient lists, allergen warnings, weight, batch numbers, country of origin, recycling symbols, period-after-opening marks — there's a lot of mandatory copy that has to fit in small spots. A well-marked dieline tells you exactly where the safe area is on every panel so you don't get a recall because the INCI list got trimmed.
Scalability
When demand grows, a clean dieline file ports to a bigger press, a different supplier, or a new market without you redrawing anything. Sloppy dielines lock you to whoever deciphered them first.
The Anatomy of a Dieline
Open a dieline file in any vector tool and you'll see colored lines layered on the same drawing. Each color is a different instruction to the printer.
Cut (trim) line — the shape setter
Usually solid magenta. The path the cutting die follows. This is the silhouette of your unfolded box. Anything outside this line gets thrown away.
Bleed line — your ink safety net
Typically a few millimeters outside the cut line. Artwork that goes to the edge of the box has to extend beyond the cut line into the bleed. If the trim drifts even slightly, ink still covers the edge — no white slivers showing. Skipping bleed is the most common reason a small-batch packaging job fails QC.
Fold (score) line — the crease map
Usually dashed, in a different color than the cut. Where the press creases the paperboard so it folds cleanly. Heavy artwork that crosses a fold tends to crack when bent — keep the most important brand elements off the score lines.
Perforation line — built-in user interaction
Tiny dotted runs that let the consumer tear part of the box open. Sleeves, opening tabs, tear-strips on snack boxes — all perforated. Tells the printer to set the die to nick rather than cut.
Glue tab — the invisible backbone
A flap on one side that gets glued to the inside of the opposing panel when the box is formed. Artwork rarely goes on the glue tab because the panel above hides it once folded.
Safe area — where text actually lives
A margin inside the cut line where you keep all text, logos, and any critical visual. Trim drift, fold tolerance, and small artwork misalignment all happen at the edges; the safe area protects you from all three.
Common Dieline Styles
A few box structures cover most consumer goods. Your supplier picks the right one for your product weight and closure preference.
- Straight tuck end (STE) — the classic carton with flaps that tuck into each other top and bottom on the same face. Most cosmetics cartons, supplement boxes, light retail packaging.
- Reverse tuck end (RTE) — same idea but the top tuck comes from the back panel and the bottom from the front. Slightly more printer-friendly on long runs.
- Auto-bottom (1-2-3 bottom) — the bottom pops open and locks itself when you square up the box, no glue needed at the bottom. Good for heavier products or short retail moments where speed matters.
- Sleeve — an open band that wraps around an inner tray or another box. All graphic, no structural closure.
- Mailer (roll-end tuck-top) — corrugated box for e-commerce shipping. Branded inside and out because the unboxing is part of the product experience.
- Pillow box — die-cut curve at top and bottom that gives the box a pillow shape. Gifting and small accessories.
- Window box — a die-cut opening with a clear plastic insert so the product is visible without opening the box. Common for crafts and food.
The Traditional Workflow vs. the Modern Way
For two decades the standard process to design on a dieline has been:
- Receive the dieline AI or PDF from the printer.
- Open it in Adobe Illustrator.
- Lock the dieline layer so you can't accidentally move the cut and fold paths.
- Create a new layer for artwork. Draw and place per panel.
- Extend any panel artwork past the cut into the bleed.
- Make sure no important elements cross a fold or sit outside the safe area.
- Export as PDF/X-1a (or whichever standard your printer asks for) and send.
It works, but it locks the whole job behind a designer with Illustrator skills and a paid subscription. For an indie cosmetics founder doing a 500-unit pilot, that's a hard chokepoint.
Modern browser-based tools handle the same workflow without the software. You drop the dieline on the page, the tool parses the vector paths and detects each panel automatically, and you design directly on top — clicking a panel and adding text, logos, or colors the way you would in Canva. That's the gap Pack AI was built for.
Five Pro Tips Your Printer Will Thank You For
- Always include 3mm of bleed. Even if your printer says they can work without it, give them the margin. A trim that drifts by 1mm without bleed shows white; with bleed it doesn't.
- Keep critical text 5mm inside the safe area. Especially anything legal — ingredient lists, weights, batch numbers. Set them small and inside.
- Don't put your logo on a fold. Cardboard creases crack the ink. Either keep it fully on one panel or split it intentionally as a design choice.
- Export to the format your printer asks for. Most want PDF/X-1a or PDF/X-4 with embedded fonts. Some take AI files. A few only take SVG. Ask before you export.
- Send a proof before the full run. Pay for one printed sample. Inspect it in your hand. Most expensive mistakes get caught in the proof and not after a 5,000-unit production run.
Designing on a Dieline Without Illustrator
Pack AI was built for the exact scenario where you have the technical dieline file from your supplier and you need to put your brand on it — fast, without learning vector software. The workflow is:
- Drop your dieline (PDF, SVG, or AI) onto the editor.
- Pack AI parses the vector paths and detects every panel — front, back, sides, dust flaps, glue tabs.
- Click a panel and design on it directly: add your logo, product name, ingredients, brand colors, a background image.
- Or describe your product in a sentence and let AI draft a typographic layout you can refine by hand.
- Export print-ready SVG, PDF, AI, PNG, or JPEG at 300 DPI and send it back to your supplier.
No Illustrator, no install, no design background required. Built for indie brands, e-commerce sellers, makers, and marketers who'd rather not learn vector graphics just to put a logo on a box.
Ready to design on your dieline?
Open Pack AI and drop in the file your supplier sent. The first design and panel preview is free.